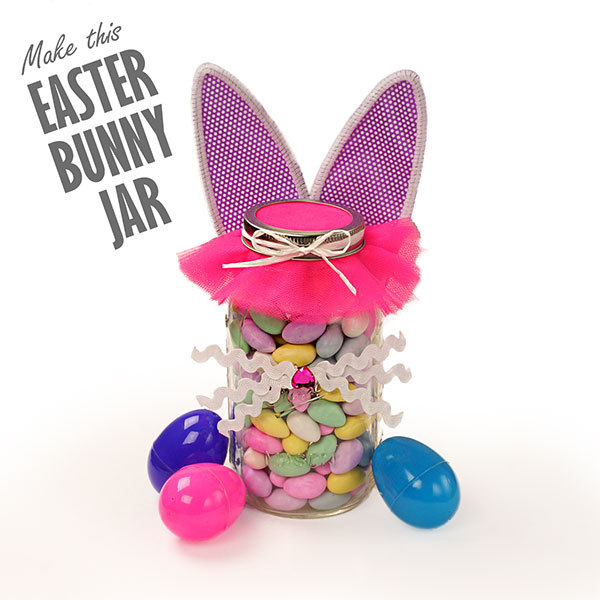
Easter is just around the corner! That means plenty of Easter baskets, dyed eggs, and bright, colorful Easter candy. They are not only delicious, they are wonderful to have as decorations around the house. This year, display them (before they’re all eaten!) in a fanciful Easter bunny jar that will have you and your kids entertained all holiday long. Follow along with our step-by-step guide for an easy DIY the whole family can enjoy!
To get started, here are the supplies you will need:
- Glass Jars
- Large Ric Rac Trim
- Your Favorite Satin Ribbon
- Tulle Fabric
- Heart Jewels
- Pipe Cleaners
- Raffia Ribbons
Fill with Easter Candy
The first step to crafting the Easter bunny jar is the easiest: fill up your jar with Easter candy! To hold the candy, use a Ball mason jar. They’re long-lasting, molded from high-quality glass, and can be re-used for preservatives after the Easter fun has passed.
Shape the Bunny Ears
After emptying a bag of candy into the jar, it’s time to make bunny ears. Using a pair of sewing scissors, carefully cut the satin ribbon into two rectangular sheets. The strips of satin ribbon should be proportional to the mason jar, but feel free to think outside the box.

Use a ribbon that is Easter-themed. We love this purple haze mili-dot satin ribbon. It’s cute, durable, and complements the Easter color theme beautifully.
Next, we’re going to shape two sets of white pipe cleaner into elongated arches—think Peter Rabbit! They should be round on the sides and come to a point at the top. Attach the white pipe cleaner onto the satin ribbon with a glue gun.
When the pipe cleaner is firmly attached to the satin ribbon, remove the excess material around each arch. After you have cut out a pair of bunny ears, glue them to the back of the mason jar.
Dress It Up in Ruffles

The next step is to decorate our Easter bunny jar with a ruffled top. For this, we suggest working with shocking pink tulle. Using the lid of the jar, trace a small circle along the tulle so that it can neatly fit into the uppermost groove at the top of the jar. This will serve as the “hat” for the bunny.
After cutting and gluing it to the lid, trace and cut out a larger circle to function as the rabbit’s hot pink top. Don’t worry about the precision of the circle––as long as it is lightly crinkled, it will be charming! The larger piece of tulle should then be placed against the opening of the mason jar. Simply fasten the lid over the material and now the bunny jar is all dressed up.
Add Some Whiskers

We’re onto the whiskers! For this step, we are going to be using white ric rac ribbon trim. First, cut the ribbon trim into six 2-inch strips and position them at the jar’s center. After separating them into groups of three (one for each side), fan them out to resemble whiskers and glue them individually.
Remember, each strip should meet at the center point! We have found that placing them directly above the logo on the jar works best.
Bring It All Together with a Heart Nose and Bow

To complete our delightful Easter bunny jar, make a dainty nose and tie it all together with a small bow! We recommend using this adorable pink heart jewel as the rabbit’s nose. The best part is you can use these colorful acrylic jewels as springboards for future DIY projects, such as bedazzling picture frames, embellishing phone cases, and more.
Carefully glue the heart jewel onto the center of the whiskers. Because the surface area is small and the glue can be dangerous to work with, practice extra precaution during this step.
Lastly, using approximately six to seven inches of white paper raffia, tie a small bow around the lid’s edge to finish this DIY!
Handcrafting this beautiful Easter bunny jar with your kids this Easter season is a great way to be imaginative and decorate the house, all while enjoying a new family tradition. Be sure to pick up your supplies at Paper Mart and have fun crafting, DIYers!