Make your next summer party stand out with this rustic DIY Lazy Susan/Turntable. Jenny at Origami Tree shows us how to make this summer craft without using any special tools besides some paint and glue. Watch the tutorial below or follow these simple steps to make your own Lazy Susan.
Here’s what you’ll need:
Wide Mouth Mason Jars
Vorra Vintage Floral Ribbon
Rectangular Scalloped Wood Tray Set
White Natural Jute Fabric
Paper Straws
Two Clay Saucers
Marbles
Paint (Orange and Turquoise paint)
Paint Brush
Sand Paper/ Sanding Block
Hot Glue Gun or Glue Dots
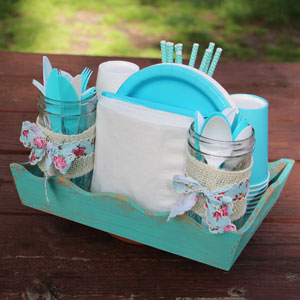
Rustic DIY Lazy Susan
Take the wooden tray and cover it with an even layer of burnt orange paint. Make sure to cover the tray completely.
Wait for the first layer of paint to completely dry. Next, start on the second layer of turquoise paint. As you are painting this second layer, it’s okay to be a bit sloppier to give the tray a more distressed look.

When the second layer is complete, leave the painted tray aside to dry. While you are waiting, you can decorate the mason jars that will be holding utensils for the Lazy Susan. Cut and wrap a piece of natural ribbon around each jar and put them on using a glue gun or another adhesive. After that is complete, add a decorative ribbon such as a floral ribbon and tie a bow right at the center.

Once the tray is dry, take a sanding block or sand paper and start to sand the edges of the tray. The purpose of sanding is to expose the first layer of paint below to give the tray a more rustic and distressed feel. Try to sand on areas such as the top, handles, and corners of the tray.
Now that the tray is completed, next step is to create the Lazy Susan. Place the tray face down. Take one of the clay saucers and place an adhesive (such as hot glue or glue dots) around the edge of the saucer. Flip it over and adhere the saucer in the center of the tray.
Take the second clay saucer and place a layer of marbles inside. It is best to almost fill up the whole saucer, but have some room for the marbles to maneuver. Flip the tray over and stack the two clay saucers together.
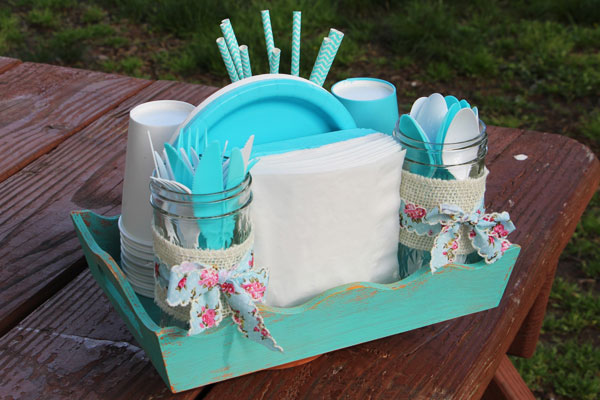
Finish off this project by placing all three mason jars filled with utensils along with other plates, napkins, etc. on top of the tray. Next, try and give your new craft a test spin! Now you have a pretty and useful DIY Lazy Susan perfect for your next summer party or picnic!
I am using this idea for my Christmas party. We always have a lot of guests so I am making a tray for each table, which will open up space in the kitchen/family room area. This is such a great and useful idea!
Liked the Lazy Susan
I will use it at my next party